Greetings bloglovers! Sorry for posting one post a month and then skipping August! I'm a bad writer! I've been neglecting this poor blog, so today I decided to write a quick post about nachos.
All of us wish we could have delicious, warm, cheesy nachos at our beck and call. Well now we can! Because it's easy! All you need are these simple ingredients:
1 Bag of tortilla chips
1 bag of shredded cheese (mexican blend is best!)
1 baking sheet
1 oven preheated to 350 degrees
Spread your chips on a baking sheet to make a single layer. Sprinkle cheese on the chips. Make sure to cover every last bit of chip. Put the baking sheet in your already preheated oven and keep an eye on them. It'll happen rather quick. Once the cheese starts to melt and you see a little bit of golden brown cheese somewhere (just a little!) it's time to pull them. Let them cool a little, then dig in. Personally, I don't let them cool, but I though if I told you to just dig in, you might burn yourselves and try to sue me. Not fun!
Monday, September 21, 2009
Friday, July 17, 2009
Bento Fever!
I've been dabbling bentos lately. I really love http://lunchinabox.net/ for ideas and tips. I learned that you can premake rice balls and freeze them, so I've been making batches of star (squeeze the rice into a star cookie cutter!) shaped rice "balls" and freezing all of those in a plastic bag (sans the individual wrapping as Biggie suggests- I get along just fine without it and not doing that saves plastic!)
The great thing about these, is that they're easy to make, you control what you eat, you don't have much waste left over from them because most of the materials can be reusable.
Since I've been stuck in my house since April, I finally got to use everything I've learned last Saturday at my first training session at the aquarium. I don't have any pictures because I was in a hurry, but this week I'll try to take some.
Someday I wanna spring for "real" bento gear, but what I have is more than adequate. My box is a cheap tupperware with a cover that has a rubber band seal and a tab on each side that goes down to lock the box. I got it for $1 at my local dollar store. I also have chopsticks, that I am not proud of. You see, I went to the store to buy a pack of chopsticks. My brother already had the red ones, so I grabbed the white ones that way we wouldn't mix them up. I opened up the package to use them one day, and they did not feel like plastic. They were smooth and almost earthy. I looked at the package and almost cried. They're made of ivory. I really thought that for $2/12 pack they would be just plastic.
I usually carry my whole set up in a small (about the size of a dictionary) cloth tote bag that I got for free online somewhere or another. If there's something that needs to be insulted, I use a foil/Styrofoam envelope that was the wrapper of a pack of mochi I got at my local Asian food mart. I had to save it because it's a perfect insulator.
I packed 2 of my star shaped rice balls, a cupcake cup full of sliced up grilled chicken, another cupcake cup full of fresh strawberries, and filled any gaps with fresh cherries and those little fruit jello cups (saved the cups to reuse for making my own jello)from Asian markets. The result was great. It was enough to keep me going for the remaining 4 or so hours of training, and this is a really on your feet job, so I'm surprised so little filled me up. I also got a compliment on my arrangement during lunchtime! I did not expect that.
Wednesday, June 17, 2009
Care Profile: Guinea Pigs
Boy oh boy, did I ever have a disaster the other morning. I was unclogging the filter on one of my fish tanks, and instead of cleaning it out after, I stupidly just put it right back in the tank and turned it on. Seconds later, the water in my tank was a murky brown. Use spring water to change my tanks and I don’t have any right now since it’s during the week, and of course with no car, I can’t very well get any. So I started freaking out since the usually prescribed method to deal with murky water is a massive water change. To top that all off, after being cleaned the filter stopped working. Luckily, I had a brand new 30g filter in my closet that my boyfriend bought me. That thing is powerful and it cleared the murk right up. Crisis avoided.

On to the topic at hand: Guinea Pigs
Often overlooked, Guinea Pigs are very neat little animals. That’s why I’m writing up a Care Profile of them for you! First a little bit about their origins. Their scientific name is Cavia Porcellus, thus many people often call them Cavies as well. Originally they come from South America, and today they are still considered a food item there and other parts of the world. Here in the good ole US of A, most of us consider them pets.
Diet: Adult Guinea Pigs, like all pets (and us humans too!) Need a varied diet to stay healthy and live to their full potential. They should have a daily staple of Guinea Pig pellets, which from what I understand, are a formulation of hay and other natural ingredients that have many of the vitamins and good stuff they require in their diet. You should also give them a nice pile of Timothy hay to graze on at their leisure. You can supplement their diet with leafy greens and give them fruit or vegetables sparingly. Always make sure they have access to fresh water, the most reliable delivery method being a standard gravity water bottle.
Companionship: Purchasing a lone Guinea Pig is ill advised. They are very social creatures and should have at least one same sex partner. Try to avoid mixing sexes unless you have them neutered. We all know that babies mean more babies and so on. If you get your pigs from different sources, quarantine them in different rooms for a few weeks to make sure nobody gets anybody sick. Having a friend will not stop your pigs from loving you as long as you handle them both everyday and make an effort on your part. Remember, Rome wasn’t built in a day and neither are friendships.
Housing: Do not use those so called “Guinea Pig” cages from the pet store. They are much to small for a single Guinea Pig, let alone two. Most Guinea Pig owners use “Cube and Coroplast” (or C&C) cages. Coroplast is a sign makers plastic, and you can get it a sign stores. Cubes are coated wire cubes that are intended for storage. You can buy them most anywhere you find household storage items. I’ll include a link to a full website dedicated to these cages at the end of this post. Whatever you choose to use for your cage, it should be at least 7 or 8 square feet per pair or single pig. Bigger is always better.
Bedding: Guinea Pigs are sensitive to dust (as with most small pets) and it can cause serious respiratory problems, so only use a bedding that is free of dust. Carefresh and Aspen shavings are often reccomended. Another method I recently learned about is much cheaper and cleaner. It involves lining the cage with a few towels (to absorb urine) and place a layer of fleece on top of that. You just do a daily spot cleaning to get rid of the poop and toss the bedding into the washing machine once a week to get rid of the urine. The best part is that the bedding is reusable and a one time cost.
Breeds: There are quite a few Guinea Pig breeds recognized by the American Cavy Breeders Association (ACBA). American is the most common breed and if you see you GP in the pet store, that’s probably what it is. Many of the other breeds have a continually growing long coat. If you want to keep their fur long, you’ll have to brush it daily and bathe them every so often. If you don’t want to deal with this, then carefully trim their fur to the desired length. Have someone experienced do it if you’re not sure how.

Links: Most of the information presented I learned from google searches and my friendAzusanga who has guinea pigs herself (In fact, all the beautiful pigs you see in this post belong to her!). Here are some of the sites I used that have much more information about Gps than this summary of care:
http://www.guinealynx.info/index.html (General Care Information)
http://www.cavyspirit.com/ (General Care Information)
http://www.guineapigcages.com (Lots of information about building C&C Cages!)
http://www.peteducation.com/article.cfm?c=18+1800&aid=2838 (Information about Guinea Pig Breeds)
More Pictures: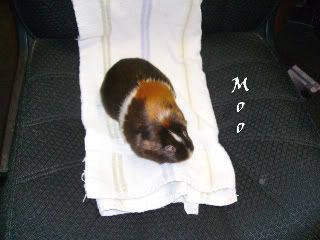
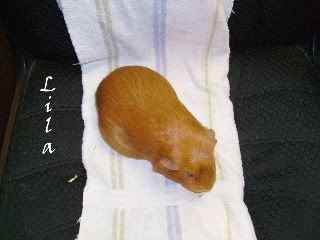
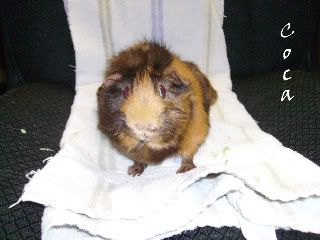 [Thanks Azu for letting me use pictures of your girls!]
Well, I hope you enjoyed the first ever Vanilla Bean Care Profile! It’s been fun writing and researching this entry, but boy am I glad it’s done. I hope anyone looking to buy/adopt a guinea pig has gleaned useful information from it. Until next time, Wheek Wheek!
On to the topic at hand: Guinea Pigs
Often overlooked, Guinea Pigs are very neat little animals. That’s why I’m writing up a Care Profile of them for you! First a little bit about their origins. Their scientific name is Cavia Porcellus, thus many people often call them Cavies as well. Originally they come from South America, and today they are still considered a food item there and other parts of the world. Here in the good ole US of A, most of us consider them pets.
Diet: Adult Guinea Pigs, like all pets (and us humans too!) Need a varied diet to stay healthy and live to their full potential. They should have a daily staple of Guinea Pig pellets, which from what I understand, are a formulation of hay and other natural ingredients that have many of the vitamins and good stuff they require in their diet. You should also give them a nice pile of Timothy hay to graze on at their leisure. You can supplement their diet with leafy greens and give them fruit or vegetables sparingly. Always make sure they have access to fresh water, the most reliable delivery method being a standard gravity water bottle.
Companionship: Purchasing a lone Guinea Pig is ill advised. They are very social creatures and should have at least one same sex partner. Try to avoid mixing sexes unless you have them neutered. We all know that babies mean more babies and so on. If you get your pigs from different sources, quarantine them in different rooms for a few weeks to make sure nobody gets anybody sick. Having a friend will not stop your pigs from loving you as long as you handle them both everyday and make an effort on your part. Remember, Rome wasn’t built in a day and neither are friendships.
Housing: Do not use those so called “Guinea Pig” cages from the pet store. They are much to small for a single Guinea Pig, let alone two. Most Guinea Pig owners use “Cube and Coroplast” (or C&C) cages. Coroplast is a sign makers plastic, and you can get it a sign stores. Cubes are coated wire cubes that are intended for storage. You can buy them most anywhere you find household storage items. I’ll include a link to a full website dedicated to these cages at the end of this post. Whatever you choose to use for your cage, it should be at least 7 or 8 square feet per pair or single pig. Bigger is always better.
Bedding: Guinea Pigs are sensitive to dust (as with most small pets) and it can cause serious respiratory problems, so only use a bedding that is free of dust. Carefresh and Aspen shavings are often reccomended. Another method I recently learned about is much cheaper and cleaner. It involves lining the cage with a few towels (to absorb urine) and place a layer of fleece on top of that. You just do a daily spot cleaning to get rid of the poop and toss the bedding into the washing machine once a week to get rid of the urine. The best part is that the bedding is reusable and a one time cost.
Breeds: There are quite a few Guinea Pig breeds recognized by the American Cavy Breeders Association (ACBA). American is the most common breed and if you see you GP in the pet store, that’s probably what it is. Many of the other breeds have a continually growing long coat. If you want to keep their fur long, you’ll have to brush it daily and bathe them every so often. If you don’t want to deal with this, then carefully trim their fur to the desired length. Have someone experienced do it if you’re not sure how.
Links: Most of the information presented I learned from google searches and my friend
http://www.guinealynx.info/index.html (General Care Information)
http://www.cavyspirit.com/ (General Care Information)
http://www.guineapigcages.com (Lots of information about building C&C Cages!)
http://www.peteducation.com/article.cfm?c=18+1800&aid=2838 (Information about Guinea Pig Breeds)
More Pictures:
[Thanks Azu for letting me use pictures of your girls!]Well, I hope you enjoyed the first ever Vanilla Bean Care Profile! It’s been fun writing and researching this entry, but boy am I glad it’s done. I hope anyone looking to buy/adopt a guinea pig has gleaned useful information from it. Until next time, Wheek Wheek!
Tuesday, May 26, 2009
Grilling 101
Hello Blog readers!
I come to you from the land of failed debuts. Seriously. I posted one entry months ago and now there’s nothing. No readership or anything. Sucks for an aspiring blogger, right? Well, I’m here now and I’m jumping on the ball. I’m going to be writing a series on summer foods. The first entry, [Grilling 101]. That’s right folks, today we’re going to learn some grilling basics.
Yesterday at my house, we had an impromptu barbeque. We hadn’t used our grill in over 12 years, favoring other people’s houses when it comes to barbeque season. Despite this, I do actually know how to grill. I’ve been doing so at my grandfather’s house for years. And it’s a good thing too, since my mom is afraid of fire. I made typical cook out fair, Hot Dogs, Hamburgers, and Chicken. I had to cook in two rounds because my mom doesn’t eat red meat and she didn’t want her turkey dogs and burgers to get contaminated with our delicious beef. Fair enough, I put hers on first and cooked it as the grill heated up. She made her famous home made potato salad, and for me, some roasted potatoes. It was a good time and the food came out great.
Now on with the lesson! Well, let’s start at the beginning. Lighting a charcoal grill. I’m assuming you already have you grill and food things picked out, so if you don’t, then you better start shopping. It is vitally important to use fresh charcoal. We once tried using old charcoal and it would not light, even after we poured copious on amounts of lighter fluid on it. Go figure. So start with a fresh or relatively fresh bag. I suggest the new formula match light. It is a very quick start and it burns plenty long enough to thoroughly cook burgers, dogs, and chicken. As per the instructions, you should place the charcoal in a pyramid type formation. Now, my mom thought this meant we should put one bottom row of charcoal in the shape of a triangle. This is not the case, as I told her. You need to put in a nice bottom layer, then start building the charcoal up into a 3-D pyramid shaped concoction. I only did two layers since I used a lot on the bottom layer. Then, using MATCHES, not a lighter, just light the charcoal in several places. Just wait for the flames to die down and spread your charcoal. Voila! You have just lit your charcoal grill. Don’t you feel special? Hell, I know I do. It’s important to let the grill preheat before you start cooking. Just keep the lid on it for 15 minutes or so and then get cookin’!
Cooking on a grill really is one of the easiest ways to cook. It’s so simple even I can do it, and I can do it well. Simply slap the hamburger patties on, and LEAVE THEM ALONE for 5-10 minutes, depending on the amount of charcoal you used. You will hear some fun sizzling noises. That’s the sound of delicious being created on your grill. Worship it. After those crucial first minutes, flip the patties and you should see the grill marks on your patty. Repeat for the second side, and your patties should be done. They are done when everything is a nice dark brown color. If you haven’t yet reached this, keep them on until you judge them as done. Remember to always thoroughly cook your meat, lest you die of food poisoning. Add cheese to the top while cooking the second side if desired for a cheeseburger.
Hot dogs may seem more difficult to cook because of their shape. But if you have the standard hot dogs in a pack from the grocery store, don’t worry. They are precooked. The whole point of grilling them is to heat them up and give them a good grilled flavor. Just throw them on the grill at the same time as your hamburger patties in any little spaces you can find. They’re thin. They will fit somewhere. Now cook them as long as you cook your hamburgers and again, they should eventually grow those beautiful grill marks.
Put all of your cooked foods on a clean plate. At this point, I like to grill some buns too, because everything tastes better when it’s grilled. Just put them on the spots where your hamburgers once sat, so they can soak up the meat juices and keep a careful eye on them. Cook them for about 5 minutes on each side, or less if you have a more charcoal.
Now, onto the chicken. If using chicken breasts, simply cut slits along the length of the raw breast and then soak in your favorite marinade for 2-24 hours. Remember, when it comes to marination, longer is better. When you’re ready, toss your chicken onto the grill and cook each side until it looks like cooked chicken. It shouldn’t be too long, because the slits help it cook more thoroughly while reducing the cooking time, thus giving you juicy grilled chicken breasts. When you think the chicken is done, make a slice in the thickest part to make sure all of the pink is gone. If you’re cooking thighs or wings, you’re going to want to parboil the chicken before you grill it, otherwise the outside will burn while the inside is still raw, resulting in bad chicken. Just put some water to a boil, salt it, and place your chicken inside to boil for about 20 mins. Then soak it in whatever sauce or marinade you want, and grill it, same as the breasts.
Remember to use different plates for your raw foods and cooked foods. Never put cooked foods back on the same plate you used when it was raw unless you wash them in between. Cross contamination is BAD. When you’re done cooking, allow the coals to burn up into a dust and then properly dispose of it so you don’t set yourself on fire. I hope this guide has helped anyone who was reluctant to try grilling because they thought it was too complicated. It’s really very easy and worth it. Grilled food tastes a lot better than food cooked in an oven.
Thursday, February 12, 2009
First Post!
Hello everyone and welcome to The Vanilla Bean, so named because one of my nicknames is Vanilla, and the Vanilla Bean sounds like a cool hang out, which I hope is what this blog will become!
First, a little bit about myself. My name is Tiffany, but you can feel free to call me either Tiffy or Vanilla. I am currently 19 years old and I work in the concession business part time. Animals are my passion and I hope to someday have a career that is animal related. Graduated from high school in 2007 and I am trying to get accepted to a local community college in the Animal Care Specialist Course. I'm also hoping to find a part time job having to do with animals within the next year or so.
I love Anime and attend my local convention every year. I haven't missed it since I started going in 2005. I like to cosplay all though I am not the best seamstress, my costumes are at least accurate and passable. I play video games and my amazing boyfriend bought me an XBox 360, along with a game (Left 4 Dead), and a $120 GameStop gift card for Christmas. Yeah, he's a keeper (<3 Love you Honey.)
I like to cook, although very rarely get to cook anything from scratch because of limited funds, equipment, and time. When I do though, my entire household is treated to exotic fares they might never have tried elsewise.
I believe in peace and that everyone should be treated with a certain amount of respect unless they do not deserve it. Racism is stupid and so is any sort of prejudice. I may joke about hating those damn antarticans, but that doesn't mean I really hate them, so keep that in mind.
Born and raised in New England, I am a Sox fan and sometimes talk with a Boston accent. I also hate snow, cold, and rotaries. But I really wouldn't want to live anywhere else.
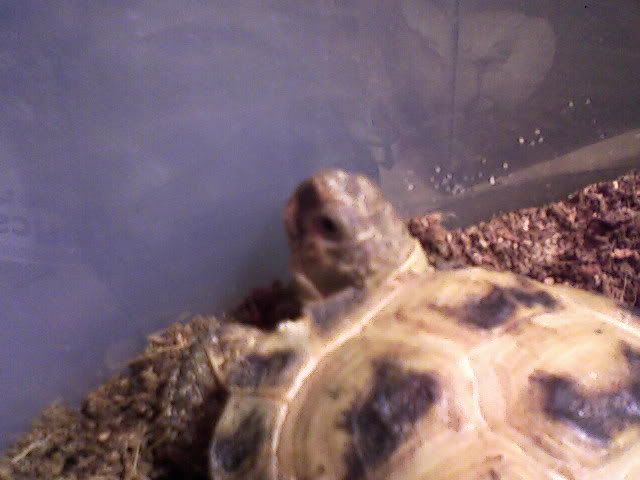
I have 4 cats, 3 fish tanks, and I just recently purchased a Russian Tortoise.
Now for a bit of an introduction to the blog. I hope to turn The Vanilla Bean into a place people can come to for entertainment and information. I'll be posting articles, rants, pictures, links, recipes and more. Many of my posts will probably be about animals, and things that I learn from day to day. My posts might have a political bias (liberal, duh) so please do not be offended. I am not trying to cause any trouble here, just adding to the wonderful resource that the internet is.
Okay, so. Since November, I've been wanting a Russian Tortoise. As soon as christmas was over, I started saving up. I was going to buy one from my local PetSmart, but he got sold before I could get my funds up. I then decided to go the smart route and get one from a breeder. I don't want to help support poachers who get these guys from the wild, and I would much rather have a baby tortoise that I can raise and "train" to be a loving little pet. So, I saved up even more money and thanks to the people on the forum at http://www.russiantortoise.org, I was refered to a pet store in California that had some captive raised baby Russians (http://petacularexotics.com I HIGHLY recommend them. From what I gather it is run by a husband/wife team and with them, the animals come first. If you need a reptile, check them out!) and was an experienced shipper. After a few e-mails back and forth with the owner, I paid for my tortoise and the wait began. Being winter, it's just been way too cold on my end to risk shipping. Luckily this week there was a break in the weather and it was 55 for two days straight. They shipped him (or her) out yesterday and I got him this morning.
Of course after all these months of waiting, it wasn't that easy. I woke up early enough yesterday morning to make sure I did not miss the Fedex guy. The pet store told me that my tortoise would be delivered next day by 10:30 AM. So when 12 rolled around and there was still no knock, I started getting frantic. I have no patience and I had to wait a few months as it was.
I decided to check my doors and lo and behold, on my front door there was a 'sorry we missed you' tag from fedex, telling me they would try delivering it again tomorrow, or that I could pick up my package at their location a few towns over after six. On the phone with my boyfriend, I started freaking out and my hero, he said he would start getting ready and drive over to my house (a 30 min drive) so he could take me to Fedex and we could demand some sort of them giving me my tortoise now action. But I decided to call them first and tell them the situation. Once the lady realized that it was a time sensitive, weather sensitive live shipment, she got right on calling the driver and sending him back to my house asap.
So finally, after months of waiting, I got my tortoise. And I sure am happy I did everything the way I did. For a mere 3 months of waiting and $225, I got myself a beautiful, healthy, baby Russian Tortoise. It was love at first blink. When I opened the box, tore off the top layer of styrofoam, threw the heat pack, and frantically pushed away all of the packing paper, I saw my little tortoise for the first time. It opened it's little eyes and gave me a look that said "Hey! I was sleeping! What gives?"
That look made everything worth it.
First, a little bit about myself. My name is Tiffany, but you can feel free to call me either Tiffy or Vanilla. I am currently 19 years old and I work in the concession business part time. Animals are my passion and I hope to someday have a career that is animal related. Graduated from high school in 2007 and I am trying to get accepted to a local community college in the Animal Care Specialist Course. I'm also hoping to find a part time job having to do with animals within the next year or so.
I love Anime and attend my local convention every year. I haven't missed it since I started going in 2005. I like to cosplay all though I am not the best seamstress, my costumes are at least accurate and passable. I play video games and my amazing boyfriend bought me an XBox 360, along with a game (Left 4 Dead), and a $120 GameStop gift card for Christmas. Yeah, he's a keeper (<3 Love you Honey.)
I like to cook, although very rarely get to cook anything from scratch because of limited funds, equipment, and time. When I do though, my entire household is treated to exotic fares they might never have tried elsewise.
I believe in peace and that everyone should be treated with a certain amount of respect unless they do not deserve it. Racism is stupid and so is any sort of prejudice. I may joke about hating those damn antarticans, but that doesn't mean I really hate them, so keep that in mind.
Born and raised in New England, I am a Sox fan and sometimes talk with a Boston accent. I also hate snow, cold, and rotaries. But I really wouldn't want to live anywhere else.
I have 4 cats, 3 fish tanks, and I just recently purchased a Russian Tortoise.
Now for a bit of an introduction to the blog. I hope to turn The Vanilla Bean into a place people can come to for entertainment and information. I'll be posting articles, rants, pictures, links, recipes and more. Many of my posts will probably be about animals, and things that I learn from day to day. My posts might have a political bias (liberal, duh) so please do not be offended. I am not trying to cause any trouble here, just adding to the wonderful resource that the internet is.
Okay, so. Since November, I've been wanting a Russian Tortoise. As soon as christmas was over, I started saving up. I was going to buy one from my local PetSmart, but he got sold before I could get my funds up. I then decided to go the smart route and get one from a breeder. I don't want to help support poachers who get these guys from the wild, and I would much rather have a baby tortoise that I can raise and "train" to be a loving little pet. So, I saved up even more money and thanks to the people on the forum at http://www.russiantortoise.org, I was refered to a pet store in California that had some captive raised baby Russians (http://petacularexotics.com I HIGHLY recommend them. From what I gather it is run by a husband/wife team and with them, the animals come first. If you need a reptile, check them out!) and was an experienced shipper. After a few e-mails back and forth with the owner, I paid for my tortoise and the wait began. Being winter, it's just been way too cold on my end to risk shipping. Luckily this week there was a break in the weather and it was 55 for two days straight. They shipped him (or her) out yesterday and I got him this morning.
Of course after all these months of waiting, it wasn't that easy. I woke up early enough yesterday morning to make sure I did not miss the Fedex guy. The pet store told me that my tortoise would be delivered next day by 10:30 AM. So when 12 rolled around and there was still no knock, I started getting frantic. I have no patience and I had to wait a few months as it was.
I decided to check my doors and lo and behold, on my front door there was a 'sorry we missed you' tag from fedex, telling me they would try delivering it again tomorrow, or that I could pick up my package at their location a few towns over after six. On the phone with my boyfriend, I started freaking out and my hero, he said he would start getting ready and drive over to my house (a 30 min drive) so he could take me to Fedex and we could demand some sort of them giving me my tortoise now action. But I decided to call them first and tell them the situation. Once the lady realized that it was a time sensitive, weather sensitive live shipment, she got right on calling the driver and sending him back to my house asap.
So finally, after months of waiting, I got my tortoise. And I sure am happy I did everything the way I did. For a mere 3 months of waiting and $225, I got myself a beautiful, healthy, baby Russian Tortoise. It was love at first blink. When I opened the box, tore off the top layer of styrofoam, threw the heat pack, and frantically pushed away all of the packing paper, I saw my little tortoise for the first time. It opened it's little eyes and gave me a look that said "Hey! I was sleeping! What gives?"
That look made everything worth it.

Subscribe to:
Posts (Atom)